Compounding
Compounding will remove corrosion, surface discolorations and most
sandpaper scratches. It will blend the edges of chips and deep scratches and
make them less noticeable. When the compounding is done, the surface will be a
mirror finish albeit with serious swirl marks. The Cyclo polisher will remove
the swirl marks and provide the finish polish.
Compounding actually reforms the aluminum surface. It moves the metal
around but does not remove it. To do this requires a lot of horsepower and
right method of transferring this horsepower to the surface of the aluminum.
The Cyclo polisher does not bring enough horsepower to the surface to do this.
All surface defecfs must be removed by compounding.
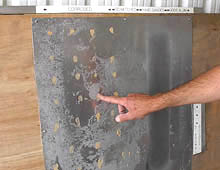
Virtually all aluminum that has not been previously polished will have to
be compounded if a mirror finish is desired. Even new Alclad aluminum has to be
compounded or the reflected image will have a frosty tone if polished with the
Cyplo polisher alone.
Unfortunately, our intuition serves us badly when it comes to compounding.
It requires very different techniques than what people are used to doing for
compounding painted finishes. And the techniques shown in the Swift polishing
video are ineffective for removing the types of surface flaws that are usually
present in old aluminum.
Here’s what is needed
1. A half-inch slow-speed electric drill or variable speed right-angle
car polisher. The drill works better because it turns slower and thus is easier
to control and doesn’t heat the aluminum as the higher speed car polishers do.
If you already own a car polisher, then use it, but otherwise get the drill.
You will get better results, faster and easier, with the drill.
Our web site (perfectpolish.com) describes all this equipment in detail.
2. Wool or poly compounding bonnet. The purists insist on wool but we’ve
tried them side-by-side on the same piece of aluminum and we can’t tell the
difference.
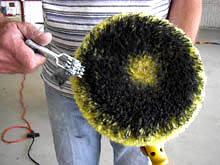
3. A pad-cleaning tool, also called a “rake” or “spurrinq tool”. This is
an essential item. The compounding pad will stop working as soon as it gets
gummed up.
4. Nuvite F7 polish. This is the best all-around compounding polish. You
can use Nuvite C on skins that are in quite good condition, but there is really
very little reason to use anything else than F7.
5. The Cyclo polisher and Nuvite S. After compounding, the area is first
polished with the Cyclo polisher and Nuvite F7 to get rid of the swirl marks
left by the compounder. This is followed by a finish polish using the Nuvite S.
Compounding Procedure
|
1. Pick an area about 18” by 18” to work. Apply fingerprints of polish
on 3” centers over this area. These are fingerprints of polish, not dabs.
Compounding works best when the pad is quite dry. This is a direct
contradiction to what our intuition tells us. |
|
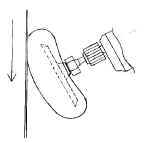
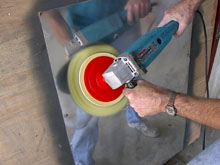
2. Work the surface in one direction only, typically from the top down.
Slowly drag the pad down the surface at maybe 1” per second with the pad angled
as shown in sketch. Use as much pressure as is reasonably possible. If you are using a high-speed polisher you will have to move it faster
down the surface to keep the aluminum from getting too hot. |
 |
|
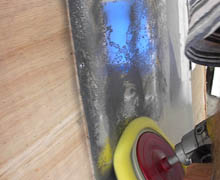
You should see bare, bright metal where the where the pad has passed
with a light line of Nuvite on either side where the pad has set down and
lifted off. If you don’t see bare metal you are using too much polish. Too much
polish will gum up the pad and act as lubricant, preventing anything useful
from happening. Dry is better. |
 |
3. Move over 4 inches or so to the line of polish that has been
deposited by the previous pass and make a pass down it. Continue on in this
manner until you have worked your way across the selected area.
Do not move the pad in sweeping motions as is done in car polishing.
|
4. After every couple of passes, stop, put the drill in reverse, and use
the pad cleaning tool to rake the pad. This separates the fibers on the pad. A
gummed up pad will not work. If you rake the pad often enough it will probably never need to be
washed. If you think your pad really needs to be washed, you may be using too
much polish. |
|
5. Add polish sparingly for subsequent passes. You will eventually develop a feel for when the pad is too dry. As a general rule, if you are seeing bright metal where the pad has been and are making very visible swirl marks, you are doing it right.
No swirl marks means that you are either using too much or too little polish, or that you are moving the pad too quickly over the surface. No swirl marks means that you are not moving the aluminum around.
After one or two passes the aluminum that has no surface damage will be bright and shiny. But repeated passes will be required to remove corrosion and scratches. Deep scratches will have their edges rounded but scratches from 400 grit and higher sandpaper will completely disappear.
It might take as many as 10 passes to round the edges of a deep scratch.
|
6. If you are using a car-polisher type of compounding polisher, use the
same general technique as the drill-type compounding polisher. You will have to
move the polisher across the surface more quickly than with the drill-type to
keep the surface from getting too hot. This is the major disadvantage of this type of compounding polisher. |
 |
|
7. After removing all of the surface defects with the compounding
polisher, use the Cyclo polisher and Nuvite F7 to remove the swirl marks. The
finish should be a mirror finish. At this point take care to remove all residual polish from around rivet
heads and seams. A solvent can be used or our new Soft Scrub bonnets. |
 |
8. Then use the Cyclo polisher and Nuvite S to do the finish polish.
This will provide the great depth and clarity of image. Using the finish polish
sparingly will reduce the polish buildup around rivet heads and seams.
There is a section in the web site (perfectpolish.com) that shows how to
use the Cyclo polisher.